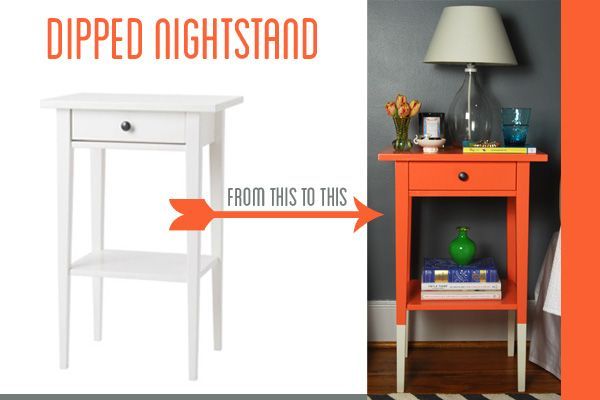
I few weeks ago I posted about how Chad and I were planning to decorate our bedroom. We had selected out a few pieces of furniture and decor, but were having trouble finding perfect nightstands in our price range. A few days before we made a trip to Ikea, I stumbled upon this DIY hack from Emily of The Sweet Beast. I have been loving the “dipped” look and was excited to try it myself. After much deliberation, Chad and I decided to try and dip the Hemnes nightstand.

We are very happy with the results, but this DIY does take a good amount of time and many coats of paint! I recommend following Emily’s instructions for the best results.
Step 1: Layout all pieces of the nightstand. Use painters tape to mark off the area you do not want to paint to achieve the dipped look. I used a ruler to make sure that the tape was even on each leg. I also wiped down the pieces before I began to paint to remove excess dust and dirt.
Step 2: I then primed the furniture. I used the recommend Zinsser Oil-Based Cover Stain and let it dry. Be sure to watch for drips, otherwise you will be doing a lot of sanding before you begin to paint.
Step 3: Once the cover stain was dry, we began to to paint the nightstand with Valspar’s Tropical Blossom latex paint. After the second coat was dry, we assembled the nightstands and removed the painters tape. I highly recommend wiping down the constructed piece before moving to step 4.
Step 4: To finish the nightstands, we applied a coat of clear polycrylic. Once it dried for 24-hours, we were finally able to use our cheery coral nightstands!
The nightstand adds a fun pop of color to the otherwise gray and white room. We also recently ordered this chevron rug from Rugs USA. It feels great underfoot. Our bedroom is almost complete, I can’t wait to share the finished space.
Hope you all are having a great week. Don’t forget to checkout the fall issue of Twin Stripe!
